


Garden levelling is necessary for creating a valuable and appealing outdoor space, but the costs can rapidly add up. With the right strategy, you can reduce costs while still achieving professional-looking results. Whether you want to hire experts or handle some of the work yourself, there are practical ways to reduce overall costs.
In this essay, we will walk you through ten practical techniques for levelling a garden. From using recycled materials and avoiding peak-season rates to doing unskilled work yourself, these money-saving strategies can help you make the most of your garden and your budget.
|
Key Takeaways: |
|
● It's essential to note that correcting severe slopes or landscaping gardens for decking or other intricate elements will require hiring a professional to level your garden, thereby avoiding costly mistakes. ● If the slope faces your house, you should leave a walkway between the retaining wall and the home to provide access and drainage. ● While many aspects of garden slope levelling can be completed independently, others, such as addressing steeper slopes or ensuring the structural integrity of retaining walls, may require professional assistance. ● Keeping your garden in good condition will help you avoid more extensive (and expensive) levelling work. ● We highly recommend the Jackery Solar Generator, a portable solar power system, such as the Jackery Solar Generator 1000 v2 or 1000 Plus, to power tools and appliances outdoors. |
Understand the Garden Levelling
Levelling your garden is the act of starting over with your lawn. Essentially, you remove your old lawn to level the soil surface. Do not panic! It requires a great deal of effort, but the results can be stunning. It can transform a run-down patch of grass into a manicured tennis court.
Levelling the garden may be too much labour for you to do on your own. If you enjoy a project, it's ideal. Alternatively, consider hiring an expert to complete this difficult task. In any case, understanding the process is essential to ensuring that you get good value for money.
Why Should I Level My Garden?
The advantages of levelling the garden include:
Reduced soil erosion, which is beneficial to the environment!
Improves drainage and diverts water runoff away from your home.
Enables your lawn to absorb more nutrients.
Gives your garden an appealing look.
Increases the value of your home.
It's essential to note that correcting severe slopes or landscaping gardens for decking or other intricate elements will require hiring a professional to level your garden, thereby avoiding costly mistakes. In some circumstances, it's more than just smoothing out a yard.
Several processes are required to ensure the finished product lasts a long time. Mistakes can damage your experience, diminish the outcome, and even injure you, your family, and guests.

Causes Of Sloped Or Uneven Garden
When it comes to sloped or uneven lawns, there are a few obvious suspects that can cause damage:
Waterlogging: During the cold and wet winter months, the weather can ruin all your hard work by creating lumpy, uneven patches in the garden.
Soil Settlement: Objects concealed beneath the soil, such as pipelines and pebbles, might influence your lawn. Excavating your yard is the most effective method of repair.
Animals: The causes of uneven lawns vary depending on where you live, but animals are the most common culprits. They will dig and wander around your garden hunting for food. Suppose you seed your grass regularly. In that case, it will develop thicker roots, making it more difficult for animals to dig it up.
Children: The kids will hurt the grass if they play a good old-fashioned game of bulldog on the soft garden soil. Pressure on the grass will cause long-term damage to its surface.
Nightcrawlers: These insects enjoy shifting soil in their search for nourishment. It's just unfortunate that it's damaging your lawn. Lowering the pH of the soil is a brilliant technique to avoid the issue.
Getting a handle on the reasons and challenges is critical before beginning the levelling process.
Building Regulations & Planning Permission for Garden Levelling
It is a common misconception that planning laws only apply to structures. However, some improvements to the grounds and gardens require planning clearance and/or building control.
Garden designers and landscaping contractors who are familiar with the rules and regulations can help you avoid difficulties. They will also be conversant with CDM requirements, which will apply once building begins.
Any increase in the level of the garden above 300 mm needs to be planned. When building a retaining wall, consider local building codes to ensure that water can flow properly.
Types of Garden Levelling
Let's take a deeper look at the numerous forms of garden levelling and their ideal applications:

Low Terraces
Building terraces that look like stairs is one way to level out a sloping garden. These help create areas for planting or sitting in your garden.
These work well on landscapes with gentle slopes, and they are an affordable way to address the problem.
Pros:
Simple and affordable
Simple enough to do as a DIY project
Cons:
Not suitable for tiny gardens
Will not be suited to gardens with steep slopes
Steep Slope Terracing
Terracing a garden with a steep slope needs more work than merely shifting dirt about. When levelling a high slope, you need to rush to avoid weakening the foundation of your home.
Pros:
A variety of design and material options
Builds a durable and robust structure
Cons:
Higher construction costs compared to low terraces.
Not ideal for DIY owing to the demanding effort.
Retaining Wall
Instead of terracing, consider creating a wall around the garden to maintain a consistent ground level. If you don't have a lot of room or don't want to spend a lot of time terracing, this is a decent option.
Pros:
Suitable for smaller gardens.
Easier to construct than complete terracing
Cons:
Requires high-quality, durable materials for long-term use
If not correctly designed, the structure may collapse.
What Does Garden Levelling Involve?
The procedure and logic for levelling a garden are the same whether the slope is facing away from or towards your house. However, if the hill faces your home, you should leave a walkway between the retaining wall and the house to provide access and drainage.

Ensure You Have Permission
This is a key initial step. Check with your energy provider and your local council to make sure there are no damaged wires under your garden and that the work you intend to conduct does not require planning approval. If planning permission is required, obtain it before starting work.
Determine the Slope's Rise and Run.
This phase allows you to determine the height of the retaining wall. A string is connected to two posts at the top and bottom of the slope. The string is referred to as the 'run,' and its height on the second stake as the 'rise.'
The string on the upper stake should begin at ground level and stretch to meet the other stake. Place a spirit level on the line at this point to confirm that it is level.
This phase defines the retaining wall's height as well as the soil needed to fill the gap behind it.
To calculate the estimated volume of the space behind the retaining wall, multiply the area of this triangle by the size of your retaining wall.
Water the Area You'll Be Digging
Try to do this at least 24 hours before digging to make the ground simpler to work with. However, avoid overwatering because moist soil can be equally challenging to work with as dry soil.
Build a Retaining Wall with Wooden Sleepers
A retaining wall may require some heavy lifting. A retaining wall is designed to protect newly raised land in your yard and prevent your beautiful new flat lawn from collapsing after a rainstorm.
The wall can hold up the weight of the dirt and the water that collects when it rains. The parts of the wall must be robust enough to keep it from falling.
Try to make the retaining wall no higher than two feet. They are stressed right now, which makes it more probable that they may fall.
If your sloped garden has a rise of more than two feet, consider building a series of terraces instead.
Pile Soil Behind the Retaining Wall
Once the retaining wall is in place and stable, pile the earth behind it. This soil will form the basis for your new, level garden, so proceed with caution until the ground is level.
If you merely want to grow a lawn, you can get topsoil to cover the gap underneath your retaining wall. However, if you are lowering a piece of the grass, you can fill the gap behind the retaining wall with soil from this location.
Inspect the Level
Use a spirit level to confirm the land is flat. Before compacting the soil, ensure it is level and at the correct height.
You may need to add or remove soil before moving on to the next phase. Again, measuring the level by sight is a fine place to start, but the spirit level you used will also be helpful here: set it down on the lawn in a few locations to check everything is flat and even.
You can also utilise the stakes and string approach, which involves placing a stake in each corner of your lawn and running a string at an even height between each stake. To ensure your soil has sufficient nutrients, apply a homogeneous layer of compost at this time.
Compress the Soil
After levelling the soil, compacting it will help to remove any air and cavities. This procedure lowers the likelihood of bumps and lumps forming in your newly levelled landscape following the next rain. Furthermore, it protects the retaining wall's structural integrity by subjecting it to more consistent forces.
How to Level a Garden?
You can level your garden yourself. However, several variables may make the work more challenging for you. If you do it yourself, attempt to reuse the soil you excavate to level other areas. Skips can be pricey, and removing and disposing of soil adds to the overall expense of the job.
Labour is the primary area where you may save money. If feasible, level your lawn in early spring to offer your new grass the best chance of thriving throughout the summer.
A professional could also use bulldozers, bobcats, and excavators. An expert is aware of the locations that require soil erosion protection and can promptly locate dirt fill and topsoil.
Hiring a professional ensures that your project is well-executed and will last for many years to come.
Tools & Equipment Needed
You don't always need big equipment to make your grass look nice. Before you go gardening, ensure you have a range of essential tools with you. These steps will prepare your landscape for a new patio, artificial grass, or astro turf installation.
Measuring Tape: The first step is to carefully assess your garden's highs and lows. A measuring tape serves as a compass, allowing you to pinpoint the specific regions that require care.
Garden Rake: This versatile equipment is essential for softening the ground and breaking up compacted dirt. It acts as the initial agent in preparing the terrain for levelling.
Shovel: The most common instrument for manually removing grass and contouring soil. Its adaptability makes it helpful in moulding the scenery into the contours you wish.
Turf Cutter (Manual or Powered): If you need to remove existing turf before levelling, a turf cutter makes this job much easier and faster than a spade, especially for larger areas. Powered versions can be hired.
Rotavator/Tiller: For breaking up compacted soil, mixing in new soil amendments, and preparing the ground for levelling. Essential if the ground is very hard or has a lot of old roots. Can be hired.
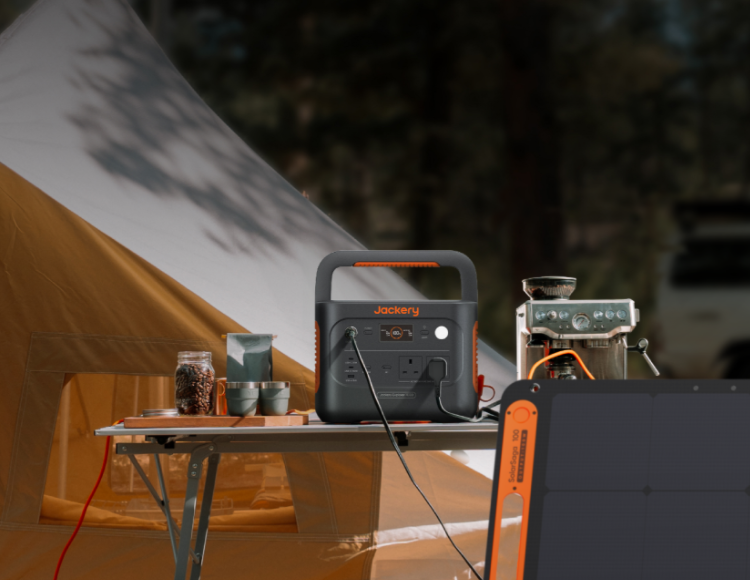
Jackery Solar Generator (Optional): or breaking up compacted soil, mixing in amendments, and preparing the ground before levelling, a rotavator is invaluable. Many are electric, and a Jackery with sufficient wattage (e.g., Solar Generator 1000 v2 or 1000 Plus, or higher, depending on the rotavator's power draw) can run them for extended periods in areas without convenient outdoor outlets.
|
Tools & Equipment for Levelling a Garden |
||
|
Shovel |
Rake |
Wheelbarrow |
|
Spirit Level |
Stakes and Strings |
Measuring Tape |
|
Gloves |
Hand Tamper |
Lawn Roller |
|
Turf Cutter |
Rotavator |
Pickaxe |
|
Laser Level |
Mini Digger |
Portable Power |
|
Sturdy Work Boots |
Eye Protection |
Knee Pads |
How To Level a Garden In 10 Easy Steps?
Levelling the garden is a significant undertaking that takes some time. But it's well worth the effort. If you follow our 10-step approach, you'll perform an excellent job.

Step 1: Be Prepared
Because this is one of the larger garden chores, it's best to have all of the necessary tools and materials on hand before you begin. In this manner, you can avoid making endless journeys to the garden centre!
Gather your supplies and devise a plan of attack. Watch the weather prediction; it's best to stay out of the rain.
Before you begin levelling, the soil must be dry; a large rain shower might cause serious problems and significant delays. Waterlogged earth is very heavy and difficult to dig.
Step 2: Marking the Terrain
Place stakes in the ground to assist in demarcating the levelling zones.
Step 3: Clean Up the Mess
If you're entirely redoing your garden, starting from scratch is preferable. If you place topsoil on top of existing turf, all of the same issues will reappear: weeds, moss, and flooding.
Clear the ground of plants, leaves, and stones. Remove items from your garden and dispose of them at a landfill.
Remove the existing lawn with a spade or, for larger gardens, an industrial digger.
Step 4: Set Up the Surface
Use a shovel, digger, or tiller to work the soil surface. Dig down 15-20 cm and mix the topsoil. This breaks up the dirt, making it easier to work with, and allows air into the ground, which is beneficial to the new grass seedlings.
Step 5: Locate the Ground's Highest Point
Determine the highest point of your tilled soil and tighten a string between the posts in step 2. Using a spirit level, tighten numerous cords along the length and width of the dirt.
You may, of course, find the level by eye, but it is more difficult than it appears. It's preferable to have some guides to help.
Step 6: Add Additional Topsoil
Add good grade dirt to the existing soil and level it out. If you are adding paving, sprinkle a thick layer of sand on top of the dirt to help keep it level over time.
Step 7: Smooth out the Surface
Keep the string from step 5 at the height specified. Use a rake or a long plant to level the soil surface.
Step 8: Turn the Ground
Once the ground is level, press it down hard. For smaller areas, use the back of a shovel. Use a roller to cover bigger areas.
Step 9: Allow the Dirt to Rest
After you put the new dirt down, allow it to settle for a few days before proceeding to the next part of your project. This makes sure that the surface is entirely flat and has no low spots.
Step 10: Water
If you are planting a new lawn, whether with turf or grass seed, make sure the soil is moist. If there hasn't been any rain since rolling, lightly moisten the soil before turfing or planting new seeds.
DIY or Professional Help?
You can do a lot of the work to level a garden slope yourself, but other tasks, such as dealing with steeper slopes or ensuring that retaining walls are strong enough, may require the help of a professional. In the long term, hiring a professional can save you money by ensuring that your garden meets all of the requirements and receives the necessary planning approval.
Pros and Cons of DIY Levelling
It might be satisfying to take on the job of levelling your garden. It's nice to see how your work has made the garden more functional.
It can also be a better deal, since the main costs are your time and hard effort.
But there are specific problems with levelling your garden yourself. Without the right tools or knowledge, the job can be physically demanding and time-consuming.
Mistakes can occur, which may result in poor drainage or an uneven finish.
Pros and Cons of Hiring a Professional
Hiring a professional team to level your garden has its own set of perks. Their knowledge, tools, and experience help you achieve a high-quality finish.
Professionals can also address potential issues, such as complex gradients or underlying structures, to ensure optimal performance.
However, professional services are not free of charge. Consider it an investment in a hassle-free approach that will produce results that meet your expectations.
Jackery Solar Generators for levelling a Garden
While you might initially think of hand tools for levelling a garden, a Jackery Solar Generator can be a surprisingly helpful and environmentally friendly addition, especially if you're tackling a larger or more involved levelling project.
Levelling a garden often means working far from the house outlets. A Jackery eliminates the need for long, potentially hazardous extension cords that can trip you up or get damaged. You can place the power station exactly where you need it. A garden often means working far from the house outlets. A Jackery eliminates the need for long, potentially hazardous extension cords that can trip you up or get damaged. You can place the power station exactly where you need it.
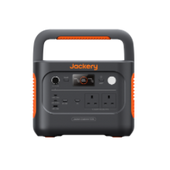
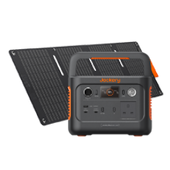
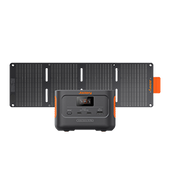
Jackery Solar Generator 1000 v2
The Jackery Solar Generator 1000 v2 (which consists of the Explorer 1000 v2 portable power station and Jackery SolarSaga 100W or 200W solar panels) is an excellent choice for levelling a garden, particularly for projects that involve electric tools and require sustained power away from traditional outlets.

1500W Continuous AC Output (3000W Surge): This is a key differentiator. Many electric garden tools, such as rotavators/tillers, electric lawn rollers, and some electric turf cutters, can have significant wattage demands. The 1000 v2's 1500W continuous output means it can comfortably run most corded garden tools. The 3000W surge capability is crucial for tools that have a higher initial power draw when starting up.
1070Wh Capacity: This large battery capacity allows for extended runtimes for your tools. You won't be constantly worrying about running out of power in the middle of a job. If your electric tiller draws 1100W, the Jackery 1000 v2 could run it for approximately 1.4 hours. This is a good amount of working time for a levelling task.
Ultra-Fast AC Wall Charging: The 1000 v2 can recharge from 0% to 100% in a remarkable 1 hour via a wall outlet using its "Emergency Super Charging" mode. This means you can quickly top it up during a lunch break or overnight, minimising downtime. Even its regular fast charging is around 1.5 hours.
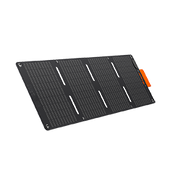
Efficient Solar Charging: When paired with Jackery's SolarSaga panels, you can recharge the unit using the sun. This is ideal for multi-day projects or if you're working in an area without convenient grid access. The 1000 v2 can take up to 400W of solar input, meaning with sufficient panels (e.g., 2 x 200W or 4 x 100W panels), it can recharge relatively quickly in good sunlight (as fast as 3-4 hours with optimal solar input). This provides true energy independence.
|
Jackery Solar Generator 1000 v2 Running Time |
|
|
Rotavator (1500W) |
0.6H |
|
Electric Lawn Roller (1000W) |
0.9H |
|
Electric Turf Cutter (1200W) |
0.7H |
|
Small Tiller (300W) |
2.8H |
|
Blower (500W) |
1.7H |
(*The working hours are only for reference; the actual working hours depend on your usage.)
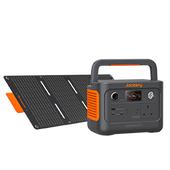
Jackery Solar Generator 1000 Plus
The Jackery Solar Generator 1000 Plus (a combination of the Jackery Explorer 1000 Plus and the SolarSaga 100W solar panel) provides a robust, reliable, and environmentally friendly solution for garden levelling, giving you the freedom to tackle your landscaping projects without being tethered to a wall outlet or relying on noisy, polluting gas equipment.

High Power Output (2000W continuous / 4000W surge): Garden levelling often involves power-hungry tools. A standard electric tiller or cultivator can draw anywhere from 6.5 amps to 15 amps, which translates to roughly 780W to 1800W (Amps x Volts, assuming a 120V power source). The 1000 Plus's 2000W continuous output means it can comfortably run most electric tillers, cultivators, and other standard landscaping power tools, such as electric edgers, trimmers, leaf blowers, or even smaller electric lawnmowers.
Large Capacity (1264Wh, expandable to 5kWh): Levelling a garden can be time-consuming, and running power tools quickly drains batteries. The 1264Wh capacity provides a substantial amount of runtime. For example, if you're running a 1000W electric tiller, you could get over an hour of continuous use. If your project requires more power or a longer duration, the ability to add up to three additional battery packs (expanding to 5 kWh) is a game-changer.
LiFePO4 Battery for Durability and Longevity: The 1000 Plus utilises a LiFePO4 battery. This is particularly important for tools that undergo frequent charging and discharging cycles, as many gardening tools do. Rated for 4000 charge cycles to 70%+ capacity, meaning it can last for many years of heavy use.
Quiet Operation: Unlike gas generators, the Jackery 1000 Plus operates very quietly (below 30 dB), allowing you to work in your garden without disturbing your neighbours or enjoying the peace of your outdoor space.
|
Jackery Solar Generator 1000 Plus Running Time |
|
|
Rotavator (1500W) |
0.7-2.7H |
|
Electric Lawn Roller (1000W) |
1-4H |
|
Electric Turf Cutter (1200W) |
0.8-3.3H |
|
Small Tiller (300W) |
3.2-13.3H |
|
Blower (500W) |
2-8H |
(*The working hours are only for reference; the actual working hours depend on your usage.)
How Much to Level a Garden?
The cost of levelling a garden can be overwhelming because it isn't simply about digging and moving dirt. The average price of garden levelling is between £30 and £50 per square metre. Building up using backfill is less expensive than digging out and eliminating garbage. Expect a landscaping specialist and 1-2 labourers to cost between £300 and £400 per day.

Cost of a Modest Garden or Patio
When it comes to levelling garden costs, a smaller garden of roughly 20 square metres typically costs between £800 and £1,600. These statistics may appear costly at first, but keep in mind that you are investing in a substantial transformation.
Cost for an Average-Sized Garden
To level a medium-sized garden of approximately 40 square metres, expect to spend between £2,000 and £2,500. These fees cover the expert levelling of your property, which creates a blank canvas for your dream garden to take shape.
Cost Variances by Region
When inquiring about the cost of levelling a garden in the UK, it is essential to consider geographical differences. Calculating garden levelling expenses can be challenging; for example, in Newcastle, levelling a 40-square-metre garden may cost approximately £2,000.
However, when you move further south, particularly in London, costs might rise by up to 50%. So, that identical yard in the capital may cost you anywhere from £3000 to £4,000.
This pricing gap is primarily the result of higher personnel costs, increased disposal fees, and higher overall living expenses in the South.
While this may be a bitter pill, rest assured that no matter where you are, you can shop around for the most competitive costs. This is simple work for any skilled landscaper, so they should be able to secure your employment at a competitive rate.
Material Costs (Topsoil, Fill Dirt, Sand)
There is more to consider when designing your ideal garden than just the shape and size of your land. The materials we select to fill and level your land might have a significant impact on your budget. High-quality dirt is an investment in your garden's future, ensuring that whatever you plant thrives and flourishes. However, it is not only about topsoil.
Labour Costs
Suppose you hire professional garden levellers to do minor jobs. In that case, you should expect to pay between £100 and £150 per day for their work only. This may seem like a good bargain, but consider what you're getting for it. You're not just paying for their time; you're also investing in their skills, knowledge, and experience.
These skilled workers will utilise their knowledge and attention to detail to ensure your grass is flat and functional.
FAQs
The following are the frequently asked questions about the garden levelling:
1. What is the easiest way to level a garden?
Using a garden fork, dig over the exposed soil and remove any visible stones. Using a shovel, spread the levelling mixture over the exposed dirt and compact it with your feet. Water the area to remove any air pockets, then apply additional mixture as needed. Smooth the levelling mix using the back of your soil rake.
2. How to level off an uneven garden?
Fertilise a week before levelling.
Water deeply three days before levelling.
Mow short (scalp) as low as your mower will allow the day before levelling.
Spread sand around the lawn.
Drag it across the sand to level it out.
When the sand is perfect, add water to settle it.
Fill in the low regions and drag again.
3. How much does it cost to level a garden?
|
Garden size |
Price range (outside London) |
|
Small (25 m²) |
£700 - £1,500 (inc VAT) |
|
Medium (50 m²) |
£1,900 - £2,600 (inc VAT) |
|
Large (100 m²) |
£3,000 - £3,800 (inc VAT) |
|
Very Large (200 m²+) |
£4,200 - £5,000+ (inc VAT) |
(Data Source: House Keep)
4. What is the cheapest way to level ground?
The cheapest method is to use a shovel. The second cheapest option is to recruit some day workers from outside of Home Depot.
5. How to flatten a bumpy lawn?
To repair large bumps in your lawn, cut the grass and dig up the affected soil with a shovel. Peel back the grass around the bump and press it down with the back of a shovel to ensure it is level with the rest of your lawn, then eliminate any mounds that refuse to smooth down.
Final Thoughts
Levelling a garden is a significant change that makes your outdoor space more functional and visually appealing. It can be done for aesthetic purposes, to improve drainage, or as a platform for landscaping features. Planning, the right instruments (from simple hand tools like shovels and rakes to more modern machines like rotavators or even mini-diggers for bigger jobs), and a dedication to precision are all necessary.