


The dream of van life has captured the imagination of adventurers across the UK. While the showroom floor offers plenty of ready-made motorhomes, for a growing number of aspiring van-lifers, the true spirit of adventure lies in a more personal journey: converting a humble panel van. This path offers two irresistible advantages over buying off-the-shelf: the freedom to design a layout that is perfectly tailored to your lifestyle, and the potential to build your dream mobile home on a budget you control.
This raises the crucial question for every aspiring builder: can you really take a standard commercial van and successfully transform it into a bespoke, comfortable mobile home? The answer is a resounding yes. Thanks to modern innovations, from lightweight materials to powerful and simple off-grid solutions like the portable power station in the UK, the dream of building a custom camper is more accessible than ever. This guide is your definitive roadmap to making it happen.
The DVLA Rules: Making Your Van Life Build Official
Before you even think about insulation or bed frames, it's crucial to understand the legal framework in the UK. While not strictly mandatory, officially reclassifying your van with the Driver and Vehicle Licensing Agency (DVLA) from a "panel van" to a "motor caravan" on your V5C log book comes with significant advantages. This is a critical step that many newcomers to the van conversion world overlook.[1]
Why Reclassify Your Van?
Taking the time to get your conversion officially recognised by the DVLA can offer several tangible benefits that make life on the road easier and more affordable:
- Cheaper Insurance: Many insurance companies offer lower premiums for vehicles officially registered as motor caravans compared to modified commercial vans.
- Higher Speed Limits: A van under 3.05 tonnes is typically restricted to 60 mph on dual carriageways, whereas a motor caravan in the same weight class can legally travel at 70 mph.
- Lower MOT Costs: Your vehicle may be eligible for a Class 4 MOT, which is less restrictive and often cheaper than the Class 7 MOT required for many commercial goods vehicles.
- Reduced Ferry Fares: Some ferry operators offer lower prices for motor caravans compared to commercial vans, which can add up to significant savings on your travels.
The DVLA's Key Requirements
To successfully reclassify your vehicle, the DVLA's primary principle is that the vehicle's external appearance must clearly and accurately reflect its use as a campervan. This is the most critical factor and the reason many applications are denied. This rule creates a fundamental choice for converters: pursue official classification with its benefits or opt for "stealth camping," where the van's exterior remains nondescript to blend into urban environments. The DVLA’s requirements make true stealth camping impossible if you want official reclassification.
To meet the criteria, your conversion must include specific external and internal features.
Mandatory External Features:
- Windows: At least two windows are required on at least one side of the main van body, not including those in the driver or passenger doors.
- Separate Habitation Entrance: You must have a dedicated door for entering the living area, such as a side sliding door.
- Motor Caravan Graphics: Professionally applied, campervan-style graphics are required on both sides of the vehicle.
- Awning Rail: A bar for attaching an awning must be permanently fixed to the vehicle.
- High-Top Roof: The van must have a permanent high-top roof. Pop-top or elevating roofs are explicitly not accepted for reclassification purposes.
Essential Internal Features: The DVLA stipulates that all internal fittings must be "securely and permanently fixed" to the living compartment.
- Seating and a Table: You need permanently fixed seats and a table with a permanent mounting point.
- Sleeping Facilities: A bed, which can be converted from the seats, must be a permanent fixture with a minimum length of 1800mm (6 feet).
- Cooking Facilities: A permanently fixed cooking appliance, such as a single hob or a microwave, is required and must have a secure fuel source.
- Storage: The living area must contain at least one permanent cupboard or locker for storage.
A Crucial Note on Insurance
This is a point that cannot be overstated: regardless of whether you apply for DVLA reclassification or if your application is rejected, you have a legal responsibility to inform your insurance provider of all modifications made to your van. Failure to disclose changes like adding windows, insulation, or a permanent bed can invalidate your policy. In the event of an accident, you could be left uninsured and facing enormous financial risk. This is a separate and non-negotiable step from the optional DVLA process.

Choosing Your Canvas: The Best Vans You Can Live In
The foundation of your dream is the base van itself. This will be the single largest expense of your project and will dictate everything from your internal layout possibilities to your reliability on the road. Making the right choice here is paramount.
Key Decision Factors
- Size: Vans come in all shapes and sizes, from small micro-campers like a VW Caddy to medium-sized workhorses like the VW Transporter, and large panel vans like the Mercedes Sprinter or Fiat Ducato. Your choice depends on how many people will be using it, what amenities you require (like a fixed shower), and whether it will double as your daily vehicle.
- Height: In the often-damp UK climate, standing height is not a luxury; it’s a necessity for comfort and sanity. For anyone over 6 feet tall or planning to spend significant time inside, a high-top (H2 or H3) model is essential. Remember to account for the 10-15cm of height you will lose to floor and ceiling insulation.
- Budget & Reliability: It's tempting to buy the cheapest van you can find, but this is often a false economy. A van that constantly breaks down will ruin your adventures and drain your wallet. Look for vehicles with a solid service history and consider getting a professional mechanical inspection before you buy.
Budgeting Your Build: DIY vs. Professional Conversion Costs
The cost of your van life hinges on one major decision: will you do it yourself (DIY) or hire a professional company? This is a trade-off between money, time, and your personal skill set.
The DIY Route
This is the most budget-friendly and customisable path, offering immense personal satisfaction but demanding significant time, skills, and patience. Here’s a breakdown of what you can expect to spend, excluding the initial purchase of the van.[2]
- Basic Build (£2,000 - £5,000): This budget focuses on the absolute essentials. Think recycled materials, basic insulation, a simple timber bed frame, a portable camping stove, and a single leisure battery system for lights and USB charging.
- Mid-Range Build (£5,000 - £15,000): This is the most common budget range for a comfortable and capable camper. It allows for new materials, quality insulation, a proper fixed kitchen unit with a 12V fridge, a diesel heater (a must for UK travel), and a more robust electrical system with a split charge relay or a small solar setup.
- Luxury Build (£15,000+): This budget opens the door to high-end finishes, custom cabinetry, a full indoor shower and toilet, a powerful solar and lithium battery system, hot water, and premium appliances.
The Professional Route
For those lacking the time or skills for a DIY project, hiring a professional conversion company is the ideal choice. It guarantees a high-quality, warrantied finish and provides peace of mind, especially with complex gas and electrical work. Professional conversions typically start around £15,000 to £20,000, with high-spec, custom builds easily exceeding £40,000 to £50,000.

The Build Process: Key Stages for Your Van Conversion
A logical build order is crucial to avoid costly mistakes. Meticulous planning at the start will save you countless hours and headaches later on.
Step 1: Preparation & Gutting
The very first job is to create your blank canvas. This involves removing any existing bulkheads, flooring, and panelling from the cargo area. Once stripped, give the van a deep clean and, most importantly, treat any rust spots you find before applying a protective paint coating. This unglamorous step is vital for the longevity of your van.
Step 2: The Shell - Cutting, Sealing & Insulating
This is often the most nerve-wracking stage, as it involves cutting holes in your van. Carefully measure ten times and cut once when creating apertures for windows and roof fans. Ensure every cut is properly treated for rust and sealed with high-quality sealant to prevent leaks. Next comes insulation, which is critical for staying warm in winter, cool in summer, and reducing road noise. After insulation, install a vapour barrier to prevent condensation from reaching the van's metal skin—a key step in the UK. Finally, lay your subfloor and run all your 12V wiring for lights and sockets before you put up the walls and ceiling panels.
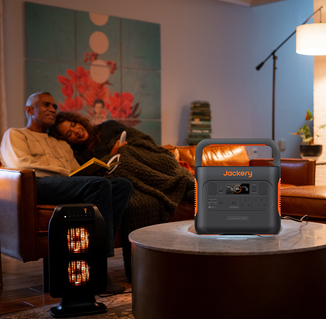
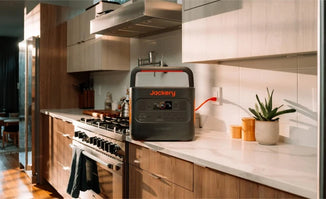
Step 3: Powering Up Your Van Life – The Jackery Solution
The electrical system is the heart of any modern campervan, but it’s also the part that most DIY builders fear the most. Traditionally, this meant designing a complex system involving leisure batteries, split charge relays, fuse boxes, inverters, and solar charge controllers—a task often requiring a professional auto electrician.
This is where technology has revolutionised the van conversion process. A modern portable power station UK solution, like a Jackery Solar Generator, completely changes the game. It’s not just a battery; it’s a complete, all-in-one power ecosystem that combines the battery, inverter, and charge controller into a single, plug-and-play unit. This approach bypasses the most complicated, dangerous, and expensive part of the build, allowing even a novice to safely and quickly install a powerful off-grid system. You simply charge it up and plug your devices in—no complex wiring required.
Step 4: The Interior & Final Touches
With the walls, floor, and ceiling in place, you can start bringing your vision to life. Build your furniture, such as the bed frame, kitchen galley, and overhead cabinets, focusing on lightweight yet strong materials. Install your water system, including fresh and grey water tanks, a water pump, and a sink. For any onboard gas (LPG) installation, it is strongly recommended that you seek professional, certified help. Finally, install your essential safety equipment: a fire extinguisher, a smoke alarm, and a carbon monoxide detector.

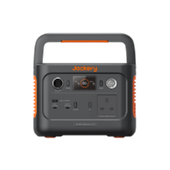
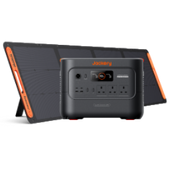
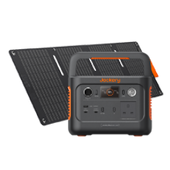
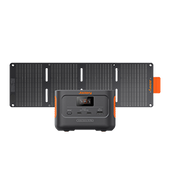
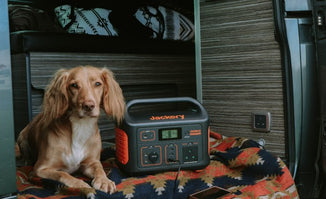
Jackery Portable Power Station UK Recommendations
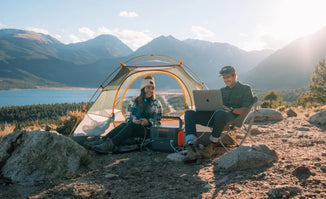
A Jackery Solar Generator pairs a high-capacity portable power station with high-efficiency solar panels for RV use, creating a self-sufficient and eco-friendly power source for your adventures. Here are two excellent options for your van life build.
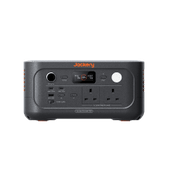
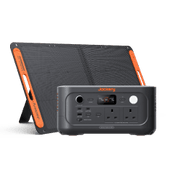
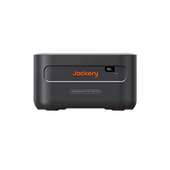
For the Ultimate Off-Grid Build: The Jackery Solar Generator 3000 v2
For those planning to live in their van full-time or who simply don't want to compromise on power, the Jackery Solar Generator 3000 v2 is the ultimate solution.
- Immense Power: With a continuous 3600W output and a massive 3072Wh capacity, it can run multiple demanding appliances at once. It can power essential items like a full-size fridge for over 30 hours, making it a true replacement for a complex, professionally installed system.
- Compact & Quiet: Despite its huge capacity, it is the world's lightest and most compact 3kWh LFP power station, saving valuable space and weight in your build. In Silent Charging Mode, it operates at an ultra-quiet 27dB, ensuring a peaceful night's sleep.
- Smart Energy Management: The smart power modes allow you to maximise solar energy usage and charge during off-peak hours, saving money and reducing your environmental footprint—perfect for sustainable off-grid living.
- Ultra-Fast Charging: You’re never without power for long. It can be fully recharged from a wall outlet in just 1.8 hours, or in as little as 3.5 hours using 1000W of solar input, keeping you powered up on the go.
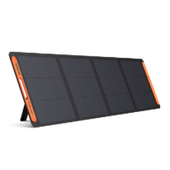
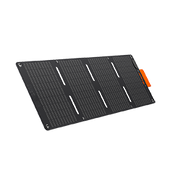
- High-Efficiency Solar: Paired with the advanced 200W solar panels, which boast a 25% energy conversion efficiency, you can generate serious power even in the less-than-perfect UK sunlight.
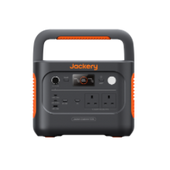
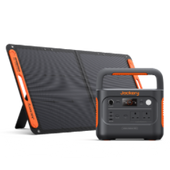
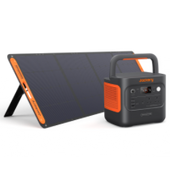
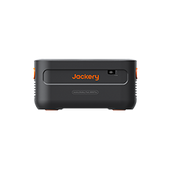
For the Versatile Adventurer: The Jackery Solar Generator 2000 v2
For weekend warriors or those with slightly less demanding power needs, the Jackery Solar Generator 2000 v2 offers a perfect blend of power, portability, and performance.
- Robust & Reliable: It provides a substantial 2042Wh capacity and a 2200W output, easily powering most van life essentials from fridges and laptops to blenders and small cooktops. Its durable LiFePO4 battery is built to last for 10 years of regular use (4000 life cycles).
- Lightweight Champion: As the lightest and smallest 2kWh LiFePO4 power station in its class, it’s incredibly easy to handle and position within your van, weighing only 38.6 lbs (17.5kg).
- Rapid Recharging: With Emergency Super Charge, it can be fully recharged in just 1.33 hours, ensuring you’re always ready for your next adventure. It supports multiple charging methods, including AC, solar, and car charging.
- Whisper-Quiet Operation: Using the app, you can set the charging mode noise level to ≤30dB, quieter than a library, for undisturbed peace and quiet inside your van.
Conclusion
Converting a panel van into a campervan is an ambitious project, but it is a profoundly rewarding one. It’s a journey of learning, problem-solving, and creativity that results in a home on wheels perfectly tailored to you. With meticulous planning, a dose of patience, and the right tools for the job, this dream is entirely within your grasp.
The open road is waiting. By taking that first step today, you are starting a journey towards unparalleled freedom. And with a simple, safe, and reliable power source like Jackery powering your comfort and connectivity, your home on wheels truly has no limits.
References
[1] Changes to DVLA Rules for Registering a Campervan Conversion - Van Glass, accessed August 27, 2025, https://van-glass.co.uk/changes-to-dvla-rules-for-registering-a-campervan-conversion
[2] Van conversion costs: Everything you need to know - Vunked, accessed August 27, 2025, https://vunked.com/van-conversion-costs-everything-you-need-to-know/


