


Golden hour photography is defined as capturing images during the brief period immediately following dawn or before sunset when natural light appears softer, warmer, and more flattering. At this time of day, ordinary scenes become dramatic compositions rich in texture and atmosphere.
Understanding how to work with golden hour light is essential for producing aesthetically pleasing images, regardless of experience level. This article explains golden hour photography, including what it is, when it occurs, why it works so well, how to predict it, and the best lighting techniques, camera settings, and advice for mastering it.
|
Key Takeaways: |
|
● The golden hour occurs just after dawn and just before sunset, providing warm, diffused light that is perfect for photography. ● Manual mode provides full control over exposure during the golden hour, enabling quick adjustments to light. ● Using RAW format during golden hour increases editing flexibility, particularly for modest light and colour tweaks. ● Backlighting during golden hour creates a gentle rim of light, enhancing photographs with a golden hue. ● We highly recommend the Jackery Explorer 500 portable power station for powering photography equipment outdoors. |
When Is Golden Hour?
Understanding when the golden hour occurs is crucial for photographers seeking to maximise the benefits of this magnificent light. The golden hour occurs twice a day, just after sunrise and just before sunset. These two windows produce the unique warm, mellow light that distinguishes golden hour photography.
The actual timing of the golden hour is determined by your geographic location, time of year, and local meteorological conditions. The length of the golden hour varies depending on the sun's position throughout the year. It might last up to an hour in some regions and seasons, but it could be shorter or longer in others.
Simply explained, the golden hour begins when the sun is low on the horizon (either rising or setting) and lasts until it is around 6 degrees above the horizon. The sun's low angle allows more sunlight to flow through the atmosphere, softening and warming the light.
How to Know When Golden Hour Will Happen?
Photographers no longer have to rely on guesswork to capture the right moment. Numerous programs and websites can calculate the precise times of dawn, sunset, and, consequently, the golden hour for any location. Tools like PhotoPills and TimeandDate.com offer extensive golden hour schedules to help you organise your shoots correctly.
Photographers may capture photographs in the best natural light by timing their shoots around the golden hour, whether it's the dazzling colours of sunrise or the warm hues of sunset.

Why Is Golden Hour Ideal for Photography?
Due to the unique quality of light it provides, the golden hour is often considered the ideal time of day for photography. During this time, the sunlight is softer, warmer, and more diffused than during other times of the day, resulting in photographs with a natural glow and brilliant colours.
The soft light softens harsh shadows and highlights, allowing photographers to catch subtleties and textures that might normally be lost in direct sunlight. The light during golden hour is great for pictures because it makes skin tones look better and gets rid of the ugly shadows that might form on features when the sun is high.
Additionally, the sun's low angle during golden hour creates long, dramatic shadows that lend objects a three-dimensional effect. This makes both landscape and architecture photos more interesting and deep.
How does the golden hour make things better?
The warm colours of golden hour light create a cosy and emotional mood that some people call mystical or cinematic. This atmosphere can make pictures more interesting to look at by making people feel calm, nostalgic, and romantic.
Because the light is directed, it also produces natural rim lighting and highlights, which can help to differentiate the subject from the backdrop and give images a more professional, polished appearance.
In brief, golden hour lighting is ideal because it enhances colours, textures, mood, and depth in photographs, enabling photographers to create stunning, visually appealing shots with minimal equipment or artificial lighting.
Predicting the Golden Moment: How to Calculate the Golden Hour
Knowing precisely when the golden hour arrives is critical for photographers seeking to capture the ideal light. Because the golden hour is only available for a limited period, planning ahead allows you to arrive prepared and positioned to capitalise on those fleeting moments.
Without precise time, you risk missing the optimum lighting or shooting too early or late when the light is harsher and less attractive. Predicting the golden hour allows you to plan your photos around natural light and take advantage of this perfect shooting time.

How is Golden Hour Calculated?
The position of the sun about the horizon determines the golden hour. It often begins when the sun is around 6 degrees above or below the horizon, either just after dawn or just before sunset.
As the sun rises or sets, it travels through the atmosphere at a shallow angle, scattering light and producing the distinctive warm glow of golden hour. This position changes on a daily basis and varies according to where you are in the world and the time of year.
Tools and Apps to Calculate Golden Hour
Thanks to contemporary technology, various tools may accurately estimate golden hour times for any location and date:
PhotoPills: Track the sun and moon, including golden hour timing and duration, using your GPS position.
TimeandDate.com offers sunrise, sunset, and golden hour times for cities worldwide.
SunCalc.net visualises the sun's course and golden hour timing on a map, allowing photographers to plan their compositions.
The Photographer's Ephemeris combines maps and sun position data to help plan outdoor shooting during golden hour.
Using these tools, photographers may enter their location and date to determine the exact golden hour windows and plan appropriately.
Factors That Affect Golden Hour Timing
The timing and duration of the golden hour can vary significantly depending on various circumstances. One important component is latitude; the closer you are to the poles, the longer the golden hour might remain in the summer and the shorter it becomes in the winter. This occurs because the sun's path varies more strongly at higher latitudes.
The season also plays a significant effect. Photographers have more time to capture the stunning light during the golden hour because the sun rises sooner and sets later in the summer. The golden hour is shorter in the winter, though, because the sun rises later and sets earlier.
Weather conditions do not alter the timing of golden hour, but they do influence the quality and look of the light. Clouds, for example, can filter light, soften shadows, and alter the tone of your photographs during golden hour.
Understanding these elements allows photographers to predict more accurately how long the golden hour will last and what type of lighting to expect, helping them to organise their shoots more successfully.
Practical Tips for Golden Hour Photography
Golden hour is a brief period of time that provides some of the most appealing natural light for photography. The sun is low in the sky, throwing long, soft shadows and providing a lovely, golden glow. Photographers must not only utilise this lovely light but also understand how to work with it creatively and technically to produce the finest results.

Tip 1: Use the Light Creatively
Positioning the sun behind your subject might result in a rim of light that highlights hair, edges, or vegetation, giving the image a surreal feel. This backlighting method is popular in portrait and landscape photography, particularly when you want to highlight shape and softness. Silhouettes can also be visually appealing when shot directly against the sun.
Tip 2: Get Your Settings Right
During golden hour, the available light is lower than at midday but more dynamic. Shooting in manual mode gives you complete control over the exposure, allowing you to balance warm highlights with deeper shadows. To maintain optimal exposure, you may need to adjust the ISO or open the aperture slightly, particularly when the light levels fade. Shooting in RAW format provides you more control over tweaking the rich tones and subtle contrasts later.
Tip 3: Plan for Changing Conditions
The golden hour does not last long, and the quality of light varies rapidly. Colours change from delicate gold to flaming orange in just a few minutes, so arrive early and keep shooting. Being adaptive allows you to capture the entire emotional spectrum that this light provides, from soothing warmth to dramatic radiance.
Tip 4: Experiment with Angles and Framing
Light behaves differently based on your position. Low shooting angles can highlight the stretched shadows associated with golden hour, adding depth and complexity to your scene. Reflective objects, such as water or glass, enhance the depth of colours and can help create more immersive compositions.
Tip 5: Use the Background to Your Advantage
Because golden light impacts everything in the frame, it's critical to consider the background as much as the subject. Trees, buildings, and even the open sky can either enhance or detract from the overall view. Look for settings that highlight the natural tones of golden hour - earthy colours and gentle textures are frequently best.
What Camera Settings Are Used During the Golden Hour?
A golden hour may give soft and appealing light, but to fully realise its potential, photographers must carefully tweak their camera settings. The balance between shadows and highlights is essential at this time, and using the appropriate settings can mean the difference between a flat image and one with warmth and depth.

Use Manual Mode for Maximum Control
Shooting in manual mode allows you entire control over your exposure settings, which is especially important during golden hour when lighting changes quickly. The intensity and direction of light shift rapidly when the sun rises and sets; therefore, using automatic exposure can result in underexposed or overexposed photos. By manually adjusting your aperture, shutter speed, and ISO, you can effectively manage these fluctuations.
Choose a Wide Aperture for Creative Depth
A wide aperture (f/2.8 or f/4) is good for achieving a shallow depth of field with soft, fuzzy backgrounds. This is especially useful in portrait photography because it helps isolate the subject and allows the warm light to wrap around them gently. Wider apertures also allow more light in, which is helpful as the sun sets lower.
Adjust ISO to Suit the Lighting Conditions
As golden hour light declines, ISO becomes increasingly important in determining exposure. Starting with a lower ISO (100-200) helps preserve image clarity and eliminate unwanted grain, but you may need to increase it as the light fades gradually. Modern cameras can handle ISOs as high as 800 or even 1600 with minimal noise, especially when shooting in RAW format.
Set a Shutter Speed That Matches Your Subject
You should adjust your shutter speed according to the subject of your shot. When using a tripod, slower shutter speeds—such as 1/60s or less—can work well for static landscapes. To prevent motion blur, a faster shutter speed (1/250s or faster) may be necessary for moving subjects, such as people or animals. Keep in mind that when the shutter speed increases, you'll need to open the aperture or increase the ISO to compensate for the decreasing light.
Use RAW Format for Editing Flexibility
During golden hour, it is very suggested to shoot in RAW format. This provides you with more post-processing options, enabling you to recover details in shadows and highlights while preserving image quality. RAW files make it easier to fine-tune the subtle colour shifts of a golden hour than JPEG files.
Consider White Balance Settings
While automatic white balance can be helpful, you may prefer to manually adjust it to "cloudy" or "shade" to accentuate the warm tones that naturally occur during the golden hour. This can bring out more vibrant oranges and gold in your photographs without requiring substantial retouching.
What Lighting Techniques Can You Use for Capturing Golden Hour Photos?
Golden Hour is known for its soft, directed light and rich, golden tones, yet merely being present at this lovely time is insufficient. To make the most of the situation, photographers should use lighting techniques that improve mood, depth, and composition. Whether you're shooting portraits, weddings, landscapes, or editorial situations, learning a few golden-hour methods will help you improve your photography.

Backlighting for Soft, Radiant Effects
Backlighting, or placing the sun behind the subject, is one of the most successful golden hour techniques. This provides a natural rim of light that highlights edges such as hair, leaves, or clothing, resulting in a lovely image. Backlighting is particularly useful for portraits, as it helps to differentiate the person from the background while still providing a warm lighting effect in the setting.
Creating Lens Flare and Sunbursts
The golden hour is the ideal moment to capture lens flare intentionally. Allowing the sun to enter the frame partially might result in magnificent light streaks or circular flares, which lend an artistic touch. To achieve a sharper effect, use a narrow aperture (e.g., f/16) to generate a sunburst – a pointed star-like light that emanates from the sun, adding drama to the picture.
Side Lighting to Add Texture and Depth
Side lighting during the golden hour increases texture and form, making it a popular choice among landscape photographers. When the sun hits the subject from the side, it casts lengthy shadows and dramatic contrasts, emphasising surface detail and creating a more three-dimensional appearance. It's particularly useful in portraiture when you want to delicately shape facial features without using stark contrasts.
Silhouetting for Bold, Minimalist Impact
To photograph silhouettes, position your subject in front of the light source and expose it to the sky. This presents the subject as a black form with no internal detail, resulting in a striking visual contrast between light and shadow. Silhouettes are most beautiful at the closing minutes of the golden hour when the sun is just above the horizon, and the hues are at their most vibrant.
Using Reflectors to Control Shadows
Even though golden hour light is gentle, it nevertheless creates shadows. A basic white or gold reflector can be used to bounce warm light into gloomy regions, which is especially effective for portraits where facial characteristics can be lost in the darkness. This helps to keep your exposure in balance without dominating natural light with artificial sources.
Combining Natural and Artificial Light (Advanced)
For photographers seeking greater control, the golden hour is an excellent time to combine natural and artificial lighting. Using a fill flash or LED light can help lift shadows while preserving the warm, golden tones of the ambient light. The key is subtlety: artificial light should complement, not compete with, the golden warmth of natural light.
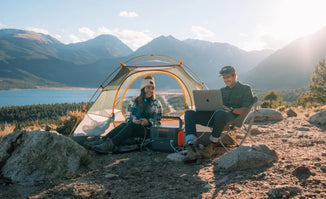
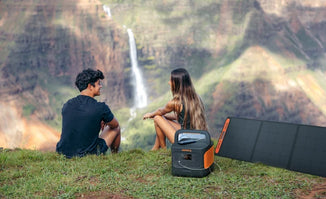
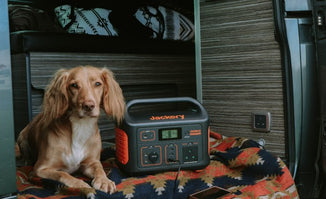
Jackery Portable Power Station for Photography
Golden hour photography is all about capturing the magical light that occurs just after sunrise or before sunset. This time of day is fleeting, often lasting only an hour or so. To make the most of it, photographers need to be efficient and prepared. This is where a Jackery Portable Power Station becomes an invaluable tool.
Golden hour often means you're shooting rapidly, taking many photos or long exposures. Camera batteries, especially for mirrorless cameras, can drain quickly. A Jackery ensures you can recharge multiple camera batteries on location, eliminating the dreaded "battery anxiety" and allowing you to focus on getting the shot.
If you're incorporating aerial shots, drone batteries are notoriously short-lived. A Jackery can recharge several drone batteries, giving you extended flight time during the critical golden hour. Many photographers use external field monitors for improved composition and focus or small LED lights for fill or accent lighting. These all require power, and a Jackery provides a stable source. If you're shooting tethered to a laptop or need to review and cull photos quickly on a tablet, a Jackery can keep these power-hungry devices running. Here, we recommend Jackery Explorer 500 for photography.
Jackery Explorer 500
The Jackery Explorer 500 is a convenient and popular choice for golden hour photography, striking a sweet spot for many photographers who require a good balance of power, portability, and versatility without overspending on size or cost.

Multiple Camera Battery Charges: A single DSLR or mirrorless battery often holds around 15-20Wh. The Explorer 500 (518Wh) can easily recharge a typical camera battery 25-35 times or more, depending on the model. This means you can power multiple cameras and shoot aggressively without worry.
Drone Recharges: Drone batteries are power-hungry (e.g., DJI Mavic Air 2 battery is about 40Wh). The Explorer 500 can recharge a drone battery around 12-13 times, giving you plenty of flight time during multiple golden hour sessions.
Laptop & Tablet Power: It can fully charge a standard laptop (e.g., 50-60Wh battery) around 8-10 times. This is crucial for tethered shooting, quick photo culling and editing on location, or simply reviewing images on a larger screen.
External Monitors & Small Lights: Easily powers external field monitors, small LED panels for fill light, or even larger video lights (up to 500W).
500W Pure Sine Wave AC Outlet (1000W Surge): This is the key. Many camera battery chargers, laptop chargers, and dedicated photography lights require an AC outlet. The 500W continuous output handles most standard photography equipment without issue, and the 1000W surge capability is useful for devices with a brief power spike when they start up.
Manageable Weight: With a weight of around 13.3 lbs (6 kg), the Explorer 500 is remarkably portable for its capacity. It has a sturdy, integrated handle, making it easy to carry along with your camera bag, tripod, and other gear to your chosen golden hour spot, even if it requires a short hike.
No Noise or Fumes: Golden hour photography is often about immersing yourself in a peaceful environment. Unlike gas generators, the Explorer 500 operates silently and emits no fumes, ensuring a tranquil shooting experience and respecting nature and others.
FAQs
The following are frequently asked questions about golden hour photography.
1. When to start golden hour photos?
Golden hour photography typically begins immediately after sunrise or approximately an hour before sunset, when the sun is low in the sky, and the light is soft and warm. This timeframe changes based on the season and location, so verify local dawn and sunset times and begin shooting 30 to 60 minutes before the sun fully rises or sets to capture the entire spectrum of golden hour light.
2. What is the difference between golden hour and magic hour?
The golden hour is defined as the first hour after dawn and the last hour before sunset, characterised by warm, diffused sunlight. The magic hour, which is also used interchangeably, refers to the period of shifting light conditions around dusk that includes both the golden hour and the blue hour. This colder, bluish light occurs after sunset or before daybreak.
3. Is 6 pm the golden hour?
Whether 6 pm is considered the golden hour varies totally on the time of year and geographical region. Golden hour frequently occurs around 6 pm or later in the summer months, notably in the United Kingdom, because sunset occurs later in the evening. However, during the winter, golden hour may occur earlier or later, so verify the sunset times for your individual day and location.
4. What is the golden hour period?
The duration of the golden hour varies by season and latitude, but it typically lasts an hour, spanning 30 minutes after sunrise and 30 minutes before sunset. Because of the low angle of the light, this photogenic time begins and ends with long shadows and warm tones that progressively shift as the sun rises and sets.
Final Thoughts
Golden hour photography remains one of the most effective and productive ways for photographers to capture images. At this time of day, the light is unlike anything other. It produces everything from landscapes to portraits with beautiful tones, soft shadows, and a natural gloss that enhances their appearance. The labour is worth it, even though scheduling and planning are quite important.


